GitHub Actions for Beginners: GitHub Actions Deployments: Environments, Approvals, and Cloud Releases
Part 4 of 5 in a series that takes you from your first workflow to production-grade automation
Who decides when your code goes to production?
In the first three parts we built a pipeline that tests your code, runs only when it should, and holds no more access than it needs. All of that happens before the part that matters most: getting the code in front of users. Releasing is the step where a mistake costs the most, so it’s worth being deliberate about it.
Safe deployments come down to four questions:
- Where does the code go? That’s environments, such as staging and production.
- Who has to approve it? That’s protection rules and reviewers.
- How does the pipeline log in to your cloud without a stored password? That’s OpenID Connect (OIDC).
- What do you do when a release goes wrong? That’s rollbacks.
This post answers each one. By the end, you’ll have a pipeline that builds your app, deploys it to staging automatically, waits for a person to approve, and then deploys to production.
What a deployment pipeline looks like:
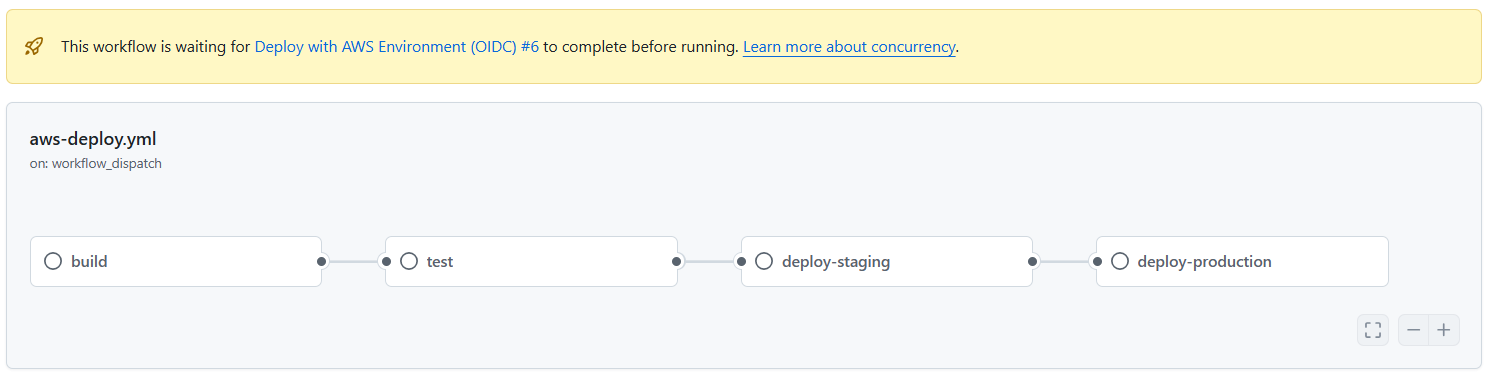
Back in Part 1 we met continuous delivery and continuous deployment. In practice, most teams use a flow like this:
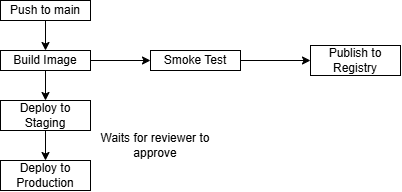
Two ideas hold this together.
Build once, deploy many. The image that goes to production should be exactly the image you tested on staging, not a fresh rebuild that happens to use the same code. We build it a single time, tag it with the commit, and deploy that same tag everywhere.
Promote, don’t repeat. Staging is a rehearsal. Production only happens after staging succeeded, and after a person said yes.
1. Environments:
An environment is a named place your code gets deployed to, such as staging or production. In GitHub, an environment is also a set of rules and settings attached to that name:
- Protection rules that decide who may deploy and when.
- Secrets and variables that exist only for that environment, so the production credentials never appear in a staging job.
- A deployment history, shown on the repository’s home page and in its Deployments view.
Creating one: Go to Settings → Environments → New environment. Create two: staging and production. The names are your choice, but you’ll use them in the workflow and in your cloud setup, so keep them short and consistent.
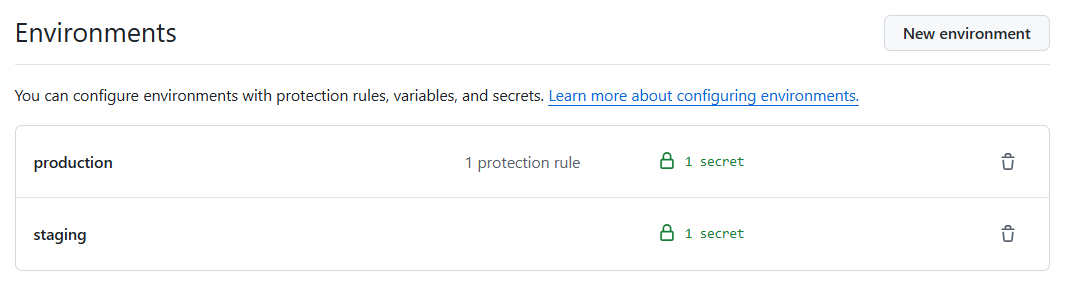
Using one in a workflow: A job opts in with the environmentkey.
jobs:
 deploy-production:
 runs-on: ubuntu-latest
 environment: production
 steps:
 - run: echo "Deploying to production"
2. Protection rules:
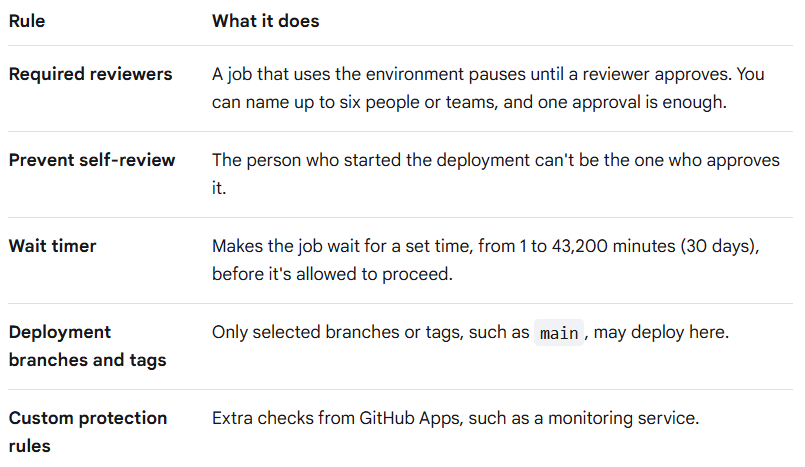
Check your plan first: Availability of these features depends on your GitHub plan and on whether the repository is public or private. At the time of writing, GitHub’s documentation lists the full set for public repositories on every plan. For private repositories, required reviewers and wait timers are only listed for higher plans, while branch restrictions and environment secrets are available more widely. Plans change, so check Settings → Environments in your repository and GitHub’s current documentation before you build a process around approvals.
If your private repository doesn’t offer required reviewers, you can still protect production by deploying only from protected tags or by making it a manually triggered workflow, so that deploying is always a deliberate human action.
Approvals: Here’s what happens when a job reaches an environment that requires approval.
- The workflow runs up to that job, then pauses with the status “Waiting”.
- GitHub notifies the required reviewers.
- A reviewer opens the run, clicks Review deployments, ticks the environment, and chooses Approve and deploy or Reject, with an optional comment.
- On approval, the job starts. On rejection, it fails.
One detail matters a lot for security: the job doesn’t start, and the environment’s secrets stay locked, until it’s approved. The production credentials stay out of reach until a person says yes.

3. Passwordless cloud login with OIDC:
To deploy to a cloud provider, the pipeline has to prove who it is. The traditional way is to create access keys, store them as secrets, and hope they never leak. Those keys are long-lived, so if they escape, they work until somebody notices and rotates them.
OpenID Connect (OIDC) removes the stored keys. Instead:
- Each job can ask GitHub for a short-lived identity token that says exactly which repository, branch, and environment the job is running for.
- The cloud provider has been told, ahead of time, “trust tokens from GitHub that say this repository and this environment.”
- The job swaps the token for temporary cloud credentials that expire when the job ends.
There’s nothing to leak and nothing to rotate. The identity token’s sub (“subject”) claim is what the cloud provider checks. Its format depends on how the job was started:
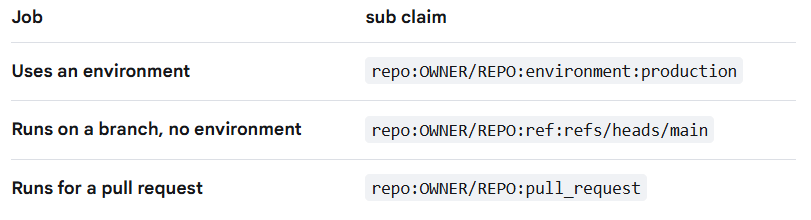
This is where the environment and OIDC come together. If your production role only trusts repo:OWNER/REPO:environment:production, then only a job that went through the production environment, including its approval, can ever get production credentials.
Setting it up on AWS: I’ll use AWS as the example. Azure and Google Cloud have the same idea. Check each provider’s documentation for the exact steps.
On the AWS side, you do this once:
- In IAM, add an OpenID Connect identity provider with the URL
https://token.actions.githubusercontent.comand the audiencests.amazonaws.com. - Create an IAM role that GitHub can assume, using a trust policy like the one below, and attach only the permissions deployment needs.
- Copy the role’s ARN.
Here’s the trust policy. Replace OWNER/REPO with your repository, and the account number with your own:
{
  "Version": "2012-10-17",
  "Statement": [
    {
      "Effect": "Allow",
      "Principal": {
        "Federated": "arn:aws:iam::<YOUR_AWS_ACCOUNT_ID>:oidc-provider/token.actions.githubusercontent.com"
      },
      "Action": "sts:AssumeRoleWithWebIdentity",
      "Condition": {
        "StringEquals": {
          "token.actions.githubusercontent.com:aud": "sts.amazonaws.com",
          "token.actions.githubusercontent.com:sub": "repo:OWNER/REPO:environment:production"
        }
      }
    }
  ]
}
Make the subcondition as specific as you can. GitHub’s own example uses a wildcard (repo:OWNER/REPO:*), which lets any branch, pull request, or environment in the repository assume the role. That’s convenient for a first test and too broad for production.
Using it in the workflow: In GitHub, open the production environment and add a variable/secret named AWS_ROLE_ARN. Create the same variables in staging, with the staging role’s ARN. Each environment gets its own values, so the same workflow file works for both.
Then, in the job:
permissions:
  contents: read
  id-token: write      # lets the job request the identity token

steps:
  - name: Log in to AWS
    uses: aws-actions/configure-aws-credentials@e1253824e5c10ff9df46874f81ed3ec929e19cfd # v6.3.0
    with:
      role-to-assume: ${{ vars.AWS_ROLE_ARN }}
      aws-region: us-east-1
In short, what happens when you push to main:
- A README-only change: nothing runs, thanks to paths-ignore.
- A code change: the image is built, smoke-tested, and pushed. Staging deploys automatically.
- Staging succeeds: the production job shows “Waiting”. A reviewer approves it, the production credentials unlock, and the job runs.
- Staging fails: production never starts.
4. Deploying safely:
A few habits make releases boring, which is what you want.
Never cancel a deployment halfway: Using cancel-in-progress: true for test runs, where cancelling is harmless, but for deployments, it isn’t, because stopping a deploy midway can leave an environment half-updated. That’s why the deploy jobs use:
concurrency:
 group: deploy-production
 cancel-in-progress: false
A deployment that’s already running is never cancelled. A newer run in the same group waits until it finishes, so deployments happen one at a time.
Check that it worked: A deployment that finished isn’t the same as a deployment that works. The health-check step calls the app’s /health endpoint, with retries to give it time to start. If that step fails, the job fails, and you hear about it before your users do.
Have a way back: Because every image is tagged with its commit, a rollback means deploying an older tag. We use manual way, it asks which environment and which tag, and it passes through the same approval rules as a normal deployment:
on:
  workflow_dispatch:
    inputs:
      environment:
        description: Environment to roll back
        type: environment
        required: true
      image-tag:
        description: Seven-character commit tag of the image to restore
        type: string
        required: true
You can also start it from your terminal:
gh workflow run "Deploy with AWS Environment (OIDC)" -f environment="staging" -f image_tag="v1.0.0"
Don’t forget what’s in the registry: Images pile up in the registry. Decide how many you want to keep, so you can still roll back, without paying to store every build forever. Most registries support retention rules.
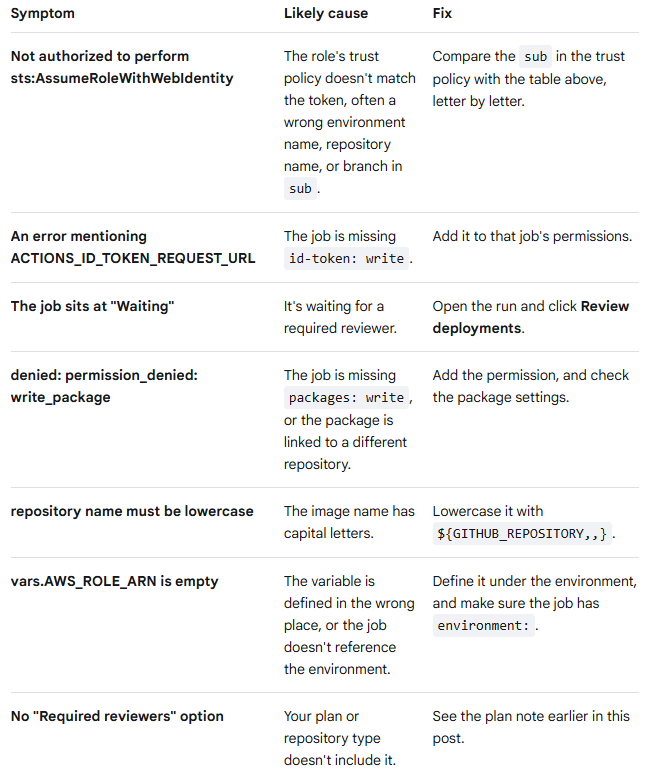
Common errors and what they mean:
Safe releases come from making the careful path the automatic one: build once, test it, ask for approval, and keep a way back. With the full pipeline working, Part 5 shows how to remove the repetition with reusable workflows and take control of where your jobs run.
What’s next in the series:
Part 1: GitHub Actions fundamentals and your first pipeline.
Part 2: Workflows in depth: triggers, conditions, environment variables, and debugging.
Part 3: Secrets, permissions, and securing your pipelines.
Part 4 (this post): Deployments: environments, approvals, and shipping to the cloud.
Part 5: Advanced patterns: reusable workflows, composite actions, and self-hosted runners.
Find all workflows used in this series on my GitHub Actions: Zero to Production repository.\
About the author
- Senior DevOps Engineer @Canarys Automations | GitHub, AWS, Docker, K8s, Terraform, CI/CD | Accelerating infrastructure & automation using AI tools (Copilot, Claude).
Comments
Join the discussionNo comments yet. Be the first to comment.
GitHub Actions - Zero to Production
In this five-part series of posts, I would be sharing hands-on guide to GitHub Actions, from CI/CD fundamentals to production-ready pipelines. Each post pairs clear explanations with examples, so you can build, test, secure, and deploy your projects with confidence.